How to record your screen on iPhone with sound ?Screenshots are a thing of the past; the iPhone now has a screen recording feature. This allows you to save your favorite YouTube clips, create tutorials for your friends, or even capture gaming sequences with ease. This guide will walk you through the steps to enable and use screen recording on your iPhone, ensuring you can record your screen effortlessly and effectively.
In this article we learn how to record your screen on iPhone with sound?
How to turn on your iphone’s screen recording features

How to record your screen on iPhone with sound
All iPhones running iOS 11 or later come equipped with a built-in screen recording feature. However, before you learn how to screen record on an iPhone, ensure that the screen record button is visible in the Control Center. If it’s not there, you’ll need to add it.
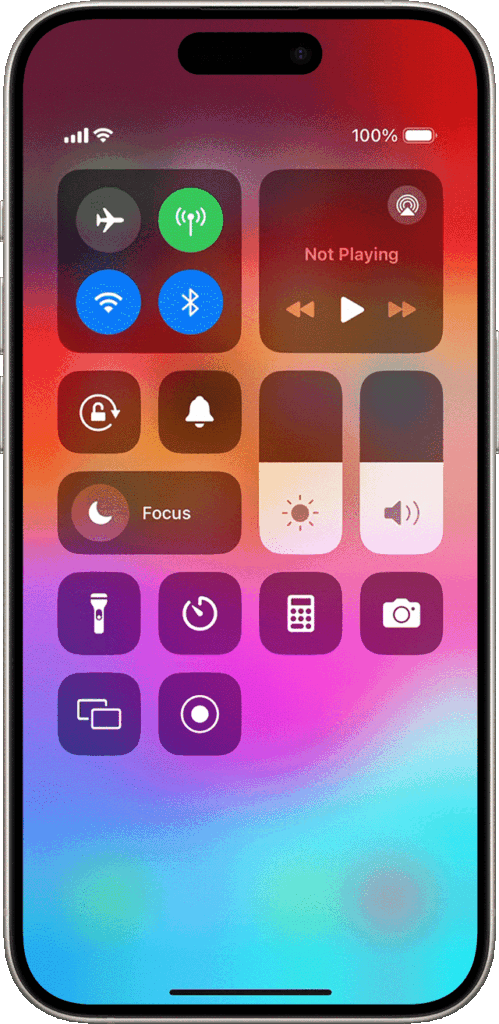
- Swipe down from the top-right corner of your iPhone’s screen (for iPhone X or later) or swipe up (for iPhone 8 or 11,12,13,14,15) to open the Control Center menu.
- Look for the screen record button, which looks like a dot encircled by a larger circle. If you see it, you can proceed to the next step.
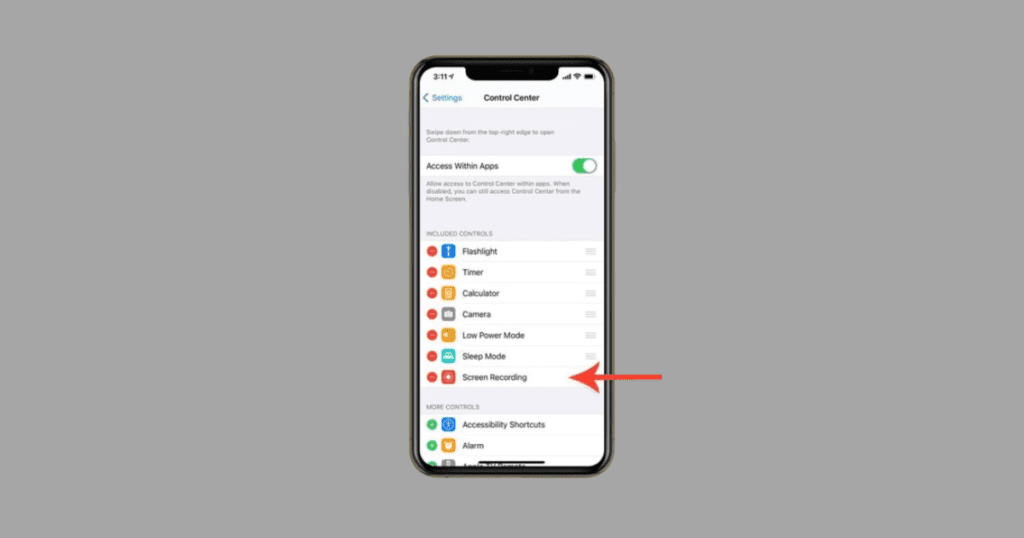
- If the button isn’t visible, Go to Settings > Control Center > Customize Controls.
- Scroll down to locate the More Controls section and locate the Screen Recording option within.
- Tap the green “+” symbol adjacent to the text. This will move the feature to the Included Controls section above.
- If you wish to remove the screen record button from your Control Center at any point, return to this screen and tap the red “-” symbol.
Following these steps will ensure that the screen record button is readily accessible in your Control Center for convenient use whenever needed.
How to record your screen on iPhone with sound 11,12,13,14,and 15 pro max

How to record your screen on iPhone with sound
After adding the screen recording button to your phone’s Control Center menu, you’re all set to begin using it. This feature allows you to capture a video of every swipe, tap, and sound on your screen for the duration of the recording. It’s just one and only feature that will simplify your life.
- Swipe down (for iPhone X or later) or up (for iPhone 8 or earlier) to access the Control Center.
- Tap the Record button.
- A three-second countdown will appear, followed by the clock turning red in the upper-left corner of the screen. For older iPhones, a red bar will appear at the top of the screen.
- Tap anywhere on the screen to close the Control Center. Your phone will now record both video and audio from your screen.
- To stop recording, tap the red clock or bar at the top of the screen, then tap Stop. Alternatively, swipe—or s/u in texting terms—to open the Control Center again and tap the Record button to stop.
How to record your screen on iPhone with sound audio

- Enable Screen Recording in Control Center settings.
- Swipe down (or up) to access Control Center.
- Tap the Screen Recording button.
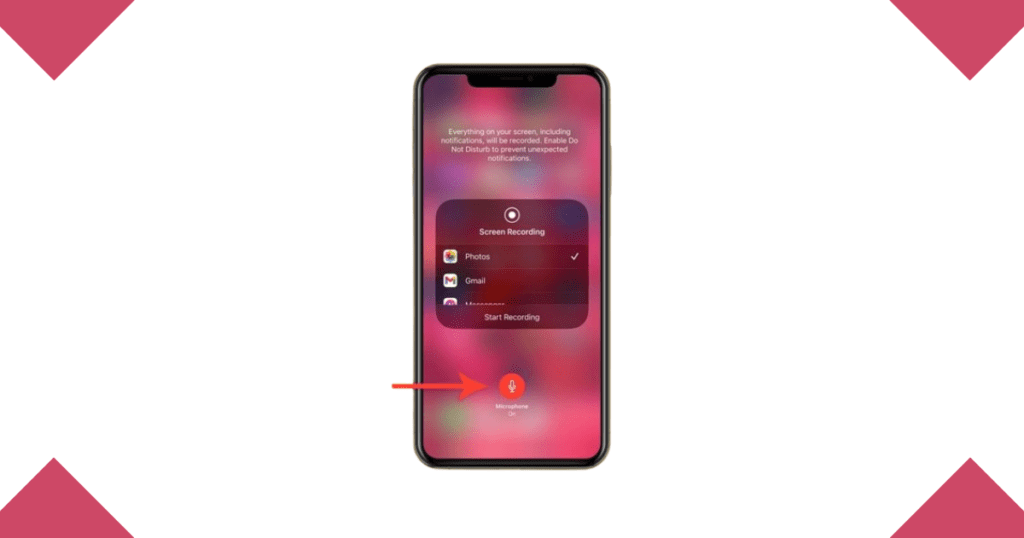
- Long-press for audio options, then tap Start Recording.
- Stop recording by tapping the red status bar and confirming.
- Find your recording in the Photos app’s Screenshots album.

How to record your screen on iPhone with sound
How to open and edit screen recording on an iPhone 11,12,13,and 14.
- Open Screen Recording: Go to the Photos app.
- Find Your Recording: Look in the “Screen Recordings” album.
- Edit Your Recording: Tap on the recording, then tap “Edit” to trim or add markup.
- Save or Share: After editing, tap “Done” to save or share your recording.
How to screen record a facetime call with sound on iPhone

How to record your screen on iPhone with sound
Screen recording a FaceTime call with sound on an iPhone involves a few steps to ensure both the video and audio are captured. Here’s a step-by-step guide:
Enable Screen Recording in Control Center:
- Open the Settings app on your iPhone.
- Tap on Control Center.
- Tap Customize Controls.
- Find Screen Recording and tap the green plus button to add it to your Control Center.
Start Screen Recording:

- Open the Control Center by swiping down from the upper-right corner of the screen (for iPhone X and later) or up from the bottom of the screen (for earlier models).
- Press and hold the Screen Recording button (a circle within a circle).
- In the pop-up menu, tap the Microphone icon to turn on audio recording (it will turn red).
- Tap Start Recording. You will see a countdown, and then the recording will begin.
Make the FaceTime Call:
- Exit the Control Center and open the FaceTime app.
- Start your FaceTime call as usual.
Stop the Recording:
- When you’re done, open the Control Center again and tap the red Screen Recording button. Alternatively, you can tap the red status bar at the top of your screen and select Stop.
- The recording will be saved to your Photos app.
How to record the screen on iPhone x
- Enable screen recording: Go to Settings > Control Center > Customize Controls and add Screen Recording.
- Start recording: Open the Control Center by swiping down from the upper-right corner of the screen and tap the Screen Recording button.
- Record audio: Press and hold the Screen Recording button, turn on the Microphone, and tap Start Recording.
- Stop recording: Open the Control Center again and tap the red Screen Recording button, or tap the red status bar at the top and confirm to stop.
- Find the recording: The recording will be saved to your Photos app.
FAQ’S How to record your screen on iPhone with sound
Why is my screen recording option not showing?
If you’re not seeing the recording option on your iPhone, it’s possible that your software isn’t up to date. Before updating your software, go to Settings, then tap General > Software Update. From there, you can check if your iPhone’s software is up to date. If an update is available, you can download and install it. This will ensure that your iPhone has the latest features, including the recording option.
Your screen recording option may not be showing because it’s not enabled in your Control Center settings. You can add it by going to Settings > Control Center > Customize Controls, then tapping the green plus icon next to Screen Recording. Once added, it will appear in your Control Center for easy access.
Why can’t I start screen recording on an iPhone
If you can’t choose the screen recording option because it’s grayed out, it might be restricted. To fix this, go to Settings, then tap Screen Time > Content & Privacy Restrictions > Content Restrictions. Scroll down to the Game Center section, tap Screen Recording, and select Allow. To start screen recording follow these steps.
- Incompatibility with your iPhone’s software version.
- Screen recording option not enabled in Control Center.
- Lack of permission for screen recording in settings.
- Insufficient storage space. A need to restart your iPhone.
- Outdated iOS software.
- Technical issues requiring Apple Support.
How long can I screen record?
You can screen record for as long as you have available storage space on your iPhone. There’s no specific time limit imposed by the screen recording feature itself. However, keep in mind that longer recordings will require more storage space. The duration of screen recording can also be affected by your phone’s battery life and overheating. If your iPhone gets too hot, it might stop screen recording automatically.
Can I screen record calls or specific apps?
In short, you can screen record anything that appears on your iPhone’s screen, including calls or specific apps. However, it’s important to respect privacy laws and obtain consent before recording calls or capturing content from certain apps.
How to record your screen on iPhone with sound
- Enable Screen Recording: Go to Settings > Control Center > Customize Controls > Add Screen Recording.
- Start Recording: Open Control Center, long-press the Screen Record button, tap the Microphone icon to enable sound, and tap Start Recording. ·
- Stop Recording: Tap the red status bar at the top and select Stop. The recording is saved to Photos.
How do I record sound with iPhone video?
To record sound with video on your iPhone, you need to use the built-in Camera app. Here’s how you can do it:
- Open the Camera app: Launch the Camera app from your home screen.
- Switch to Video mode: Swipe left or right to select the Video mode.
- Start recording: Tap the red record button to start recording video with sound.
- Stop recording: Tap the red stop button to finish recording. Your video with sound will be saved to the Photos app.
By following these steps, you can easily record video with sound on your iPhone.
Conclusion about how to record your screen on iPhone with sound
In this whole article we try to learn how to record your screen on iPhone with sound. Recording your screen with sound on an iPhone is straightforward. By enabling the screen recording feature in the Control Center and turning on the microphone, you can capture both video and audio easily. Whether for tutorials, gameplay, or video calls, this built-in functionality makes it easy to record and share your screen activities. Follow the simple steps outlined, and you’ll be able to record your screen with sound seamlessly, with the recordings conveniently saved in your Photos app for easy access and sharing.
